important topics
The robot has many functions, and the realization of these functions depends on the communication between the various modules of the robot. There are two communication methods in ros, one of which is topic communication (asynchronous communication), and the other is service (synchronous communication) communication. This section only makes some brief explanations on rostopic. For more information, you can go to rostopic on the ros wiki. If you still want to know about servicr, you can go to rosservice on the ros wiki.
Let's first understand asynchronous communication and synchronous communication:
- Asynchronous communication: After the sender sends data, it does not wait for the receiver to send back a response, and then sends the next data packet.
- Synchronous communication: After the sender sends data, the next data packet is sent after the receiver sends a response.
Topic is a node-to-node one-way communication method. The node here refers to the node in ros. One-way means that the node is only responsible for receiving the topic message or sending the topic message, and will not exist at the same time. Messages are accepted and sent. In ros, the one responsible for sending messages to the topic is called the Publisher, and the one responsible for receiving the messages from the topic is called the Subscriber.
For example:
We control the movement of the robot through the keyboard, so we need the driver of the keyboard and the robot to communicate. We will open the robot driver node and the keyboard control node, where the keyboard is the publisher, and the robot driver is the subscriber.
1 rostopic command
There are many command-line tools in ros, and rostopic is one of them. By studying rostopic, we can intuitively see how each node of the robot communicates through topics.
We can take a look at the usage of rostopic through the terminal, open the terminal, and enter the following command
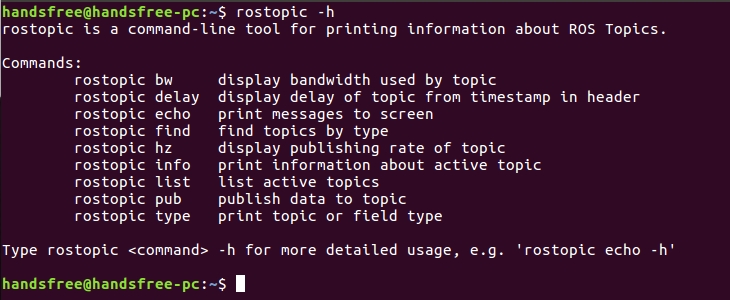
rostopic -h
Will display some usage about rostopic in the terminal

The translation is as follows:
rostopic is a command-line tool for printing information about ROS topics. command: rostopic bw shows the bandwidth used by the topic rostopic delay Show topic delay from timestamp in title rostopic echo prints the message to the screen rostopic find Find topics by type rostopic hz display topic release rate rostopic info print information about the active topic rostopic list list active topics rostopic pub publishes data to a topic rostopic type print topic or field type Type rostopic
-h for more verbose usage, e.g. "rostopic echo -h"
We mainly explain rostopic list, rostopic echo and rostopic pub
1.1 List active topics through rostopic list
Open a terminal and open the driver node of the robot
roslaunch handsfree_hw handsfree_hw.launchOpen a new terminal and list the active topics of the robot driver node
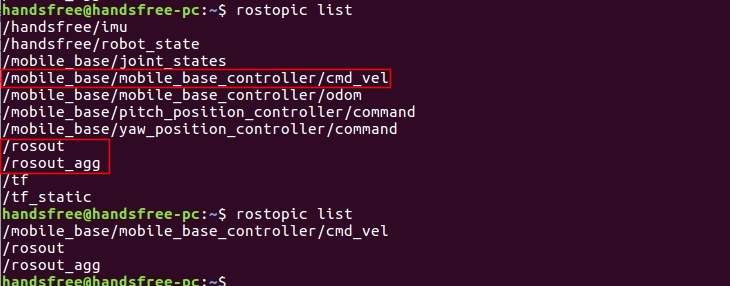
rostopic listThe following picture shows the listed activities topics

Close the two terminals, (when closing the terminal of the robot driver node, first press Ctrl+C to end the node process, and then close the terminal)
Re-open a terminal, open the keyboard control node, and enter the following paragraph
roslaunch handsfree_teleop keyboard_teleop.launchOpen a new terminal and list the active topics of the keyboard control node
rostopic listThe following picture shows the listed activities topics

By comparison, we can see that there are 3 active topics of the robot driver node and the keyboard node are the same, which means that the two nodes communicate through the same topcis.

Close these terminals, remember to use Ctrl+C to stop the node process, and then close the terminal.
1.2 Print messages to the terminal via rostopic echo
We have seen the active topic through rostopic list, so how to see the messages received by the topic
Open the terminal and start the driver node of the robot
roslaunch handsfree_hw handsfree_hw.launchOpen a second terminal and start the keyboard control node
roslaunch handsfree_teleop keyboard_teleop.launchOpen the third terminal and print the message passed by the topic to the screen
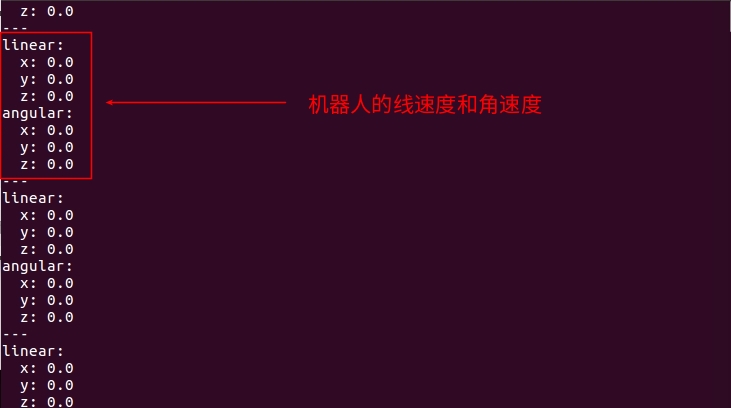
rostopic echo /mobile_base/mobile_base_controller/cmd_velNormally, you'll see the message print

Select the terminal with the keyboard control node enabled, and type
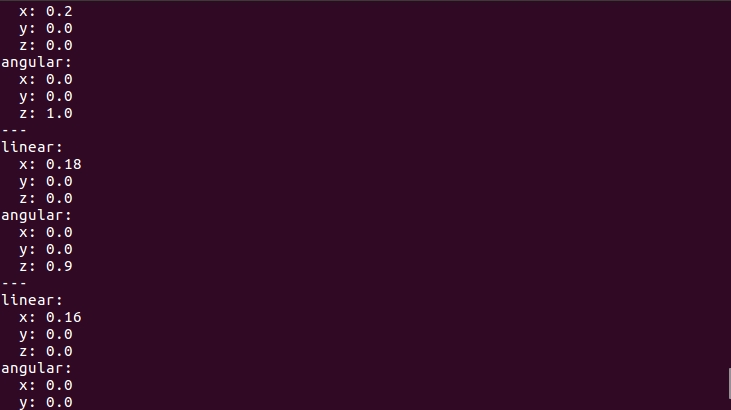
u, i, o, j, l, m,,,.to control the movement of the robot and see if the printed message has changed. As shown in the figure, the values of linear velocity and angular velocity have changed.
1.3 Publish data to topic via rostopic pub
We print the message of the topic on the terminal, and at the same time, we can use the rostopic pub command to make the terminal a publisher, publish a message of a topic, let the robot drive node subscribe to this message, and let the robot move.
Open a new terminal, copy and paste the following commands (these are one-sentence commands):
rostopic pub /mobile_base/mobile_base_controller/cmd_vel geometry_msgs/Twist "linear:
x: 0.0
y: 0.0
z: 0.0
angular:
x: 0.0
y: 0.0
z: 0.5"
Press the Enter key to rotate the robot by a small angle. Modify the corresponding linear and angular values to allow the robot to complete forward, backward, rotation, etc.
1.4 Important topic instructions
Get imu data feedback
By entering rostopic echo /handsfree/imu in the terminal, you can see
  header:
   seq: 8163
   stamp:
     secs: 1600054727
     nsecs: 591243289
   frame_id: "base_link"
  orientation:
   x: -0.00797228142619
   y: -0.0354238115251
   z: -0.181618481874
   w: 0.982698500156
  orientation_covariance: [0.0, 0.0, 0.0, 0.0, 0.0, 0.0, 0.0, 0.0, 0.0]
  angular_velocity:
   x: -0.00319267483428
   y: 0.0
   z: 0.0
  angular_velocity_covariance: [0.0, 0.0, 0.0, 0.0, 0.0, 0.0, 0.0, 0.0, 0.0]
  linear_acceleration:
   x: 0.659971177578
   y: -0.0286944005638
   z: 9.31850624084
  linear_acceleration_covariance: [0.0, 0.0, 0.0, 0.0, 0.0, 0.0, 0.0, 0.0, 0.0]
illustrate:
- orientation is the attitude quaternion
- angular_velocity is the three-axis angular velocity
- linear_acceleration is the three-axis acceleration
Obtain the basic information feedback of the underlying hardware of the robot
By entering rostopic echo /handsfree/robot_state in the terminal, you can see
  header:
   seq: 1126
   stamp:
     secs: 0
     nsecs: 0
   frame_id: ''
  system_time: 1258132864.0
  cpu_temperature: 37.0329437256
  cpu_usage: 0.0
  battery_voltage: 4.31145191193
  power_remain: -1.0
illustrate:
- system_time is the system time of the embedded lower computer, the unit is (us)
- cpu_temperature is the cpu temperature on the embedded lower computer, the unit is Celsius (°C)
- cpu_usage is the percentage of cpu usage on the embedded lower computer, value range: 0~1.
- battery_voltage is the battery voltage of the embedded lower computer, the unit is volts (V)
- power_remain is the remaining percentage of power on the embedded lower computer, the value range: 0~1. -1 means the battery is not detected.
Obtain the position, velocity and force feedback information of each joint of the robot
By entering rostopic echo /mobile_base/joint_states in the terminal, you can see
  header:
   seq: 24122
   stamp:
     secs: 1599730954
     nsecs: 12885933
   frame_id: ''
  name: [pitch_joint, wheel1_joint, wheel2_joint, wheel3_joint, wheel4_joint, yaw_joint]
  position: [2.3561785221099854, 0.0, 0.0, 0.0, 0.0, -2.3561785221099854]
  velocity: [0.0, 0.0, 0.0, 0.0, 0.0, 0.0]
  effort: [0.0, 0.0, 0.0, 0.0, 0.0, 0.0]
illustrate:
- name is the name of the movable joints on the robot, pitch represents the pitch joint of the gimbal, yaw represents the yaw joint of the gimbal, and wheels1~4 represent motors 1~4 of the chassis (the number of motors is different for different cars)
- position is the real-time position feedback of the corresponding position joints (the joints of the robotic arm and the gimbal are generally position joints, and the unit is radian)
- velocity is the real-time speed feedback corresponding to the speed joint (the motor of the chassis is usually the speed joint, and the unit is radian/S)
- effort is the real-time torque feedback for stress joints (general shutdown does not use force control)
Robot odometer feedback
By entering rostopic echo /mobile_base/mobile_base_controller/odom in the terminal, you can see
  header:
   seq: 34004
   stamp:
     secs: 1599731449
     nsecs: 704565438
   frame_id: "odom"
  child_frame_id: "base_link"
  pose:
   pose:
     position:
       x: 0.00883402861655
       y: 0.006383263506
       z: 0.0
     orientation:
       x: 0.0
       y: 0.0
       z: 0.110907605137
       w: 0.993830721563
   covariance: [0.001, 0.0, 0.0, 0.0, 0.0, 0.0, 0.0, 0.001, 0.0, 0.0, 0.0, 0.0, 0.0, 0.0, 1000000.0, 0.0, 0.0, 0.0, 0.0, 0.0, 0.0, 1 000000.0, 0.0, 0.0 , 0.0, 0.0, 0.0, 0.0, 1000000.0, 0.0, 0.0, 0.0, 0.0, 0.0, 0.0, 1000.0]
  twist:
   twist:
     linear:
       x: 0.0
       y: 0.0
       z: 0.0
     angular:
       x: 0.0
       y: 0.0
       z: 0.0
   covariance: [0.0, 0.0, 0.0, 0.0, 0.0, 0.0, 0.0, 0.0, 0.0, 0.0, 0.0, 0.0, 0.0, 0.0, 0.0, 0.0, 0.0, 0.0, 0.0, 0.0, 0.0, 0.0, 0.0, 0 .0 , 0.0, 0.0, 0.0, 0.0, 0.0, 0.0, 0.0, 0.0, 0.0, 0.0, 0.0, 0.0]
illustrate:
- pose represents the position and attitude data fed back by the odometer.
- twist represents the speed control data of the chassis.
Chassis control topic (remember: it is not the feedback of the driver, but the control data of other nodes received by the driver node)
Run keyboard remote terminal:
roslaunch handsfree_teleop keyboard_teleop.launchOpen a new terminal and enter rostopic echo /mobile_base/mobile_base_controller/cmd_vel
  linear:
   x: 0.0
   y: 0.0
   z: 0.0
  angular:
   x: 0.0
   y: 0.0
   z: 0.0
illustrate:
- linear is the linear velocity vector, which controls the distance the robot walks in a straight line, where x, y, and z are the space coordinate system. Since the robot is a car, only x will work.
angular is the angular velocity vector, which controls the steering of the robot, where x, y, and z are the space coordinate system. Since the robot is a car, only z will work.
You can also learn more about it in ros's wiki
PTZ control topics: The topics of the two degrees of freedom of the gimbal are: /mobile_base/pitch_position_controller/command and /mobile_base/yaw_position_controller/command
float64 dataExample: Gimbal looking up at 45 degrees:
rostopic pub -1 /mobile_base/pitch_position_controller/command std_msgs/Float64 -- 0.79
Gimbal turn right 45 degrees:
rostopic pub -1 /mobile_base/yaw_position_controller/command std_msgs/Float64 -- -0.79