Deep learning framework——Darknet
Video display:
Through the video, we can know that Darknet can select and recognize the targets in the picture. This tutorial focus on how to transplant open source deep-learning framework darknet to handsfree robot and complete a simple image identification with hansfree robot.
You will learn how to use darknet in handsfree robot with the pre-download model. You can use darknet for any other application as well. For example, objects classification with other sensors, object grabbing, object selection, etc.
About Darknet framework
Introduction about Darknet
Darknet mention that:
Darknet:An open source neural network with c language
Darknet is a open source neural network programed by C and CUDA, It is fast, easy to install, and supports CPU and GPU computation
Quote other relative introduction:
Darknet is a light opensource deep learning framework, which is proposed by Joseph Redmon. This framework is completely based on C and CUDA , supports CPU and GPU. The followings are the characters:
- Easy to install and configure: Just add the additional items(cuda, cudnn, opencv, etc) and catkin_make, it takes few minutes to install.
- Do not rely on any other dependence: the whole structure is programmed by C language, which do not rely on any dependence, even opencv has make a substitution for it.
- Clear structure, convenient to check and revise code. All basic files of the framework are located in src folder. The defined detective and classified function is located in example folder, which could be checked and revised directly.
- Easy to transplant: The framework is very easy to deploy to the local, you can select cpu or gpu according to the condition. It is especially convenient for deploying detective mission.
What is deep learning ?
Deep learning (DL,Deep Learning) is machine learning (ML, Machine Learning) One of the new study areas, which is called artificial intelligence, has been used in machine learning.
Deep learning is a way to study regulation and representation. It does help to word, image, sound process based on the obtained information. Its final destination is to make robot think like a human, occupying the ability of words, image, sound analysis.Machine learning is much more important than the technology we previously learned.
Machine learning is one part of deep learning, the 3 main research areas is shown below:
- Convoluted based convoluted neural network.
- Multi neural layers based Auto-Encoder Neural network, which includes auto encoder and sparse codding.
- Multi neural layers based Auto-Encoder Neural network is used for pre-training. Further, combined identification information, the Deep belief network in neural network weight will be optimized.
What is neural network?
Artificial Neural Networks( ANNs ) or Neural Networks(NNs), Connection Model, is animal neural networks feature mimicry math model, which is computed by distributed parallel computing. It can modify multi hidden layers based on complexity of system layer, so that process the information.
What is the relationship between deep learning and neural networks?
Neural networksBriefly, it is one of the machine learning methods, which is mimicked on how the human brain process when designed.It is expected to function logically like the human brain.
Deep learningAn extension of neural networks, which is a combination of algorithm. But this a algorithm is based on multi layers neural networks.
So deep learning is a kind of new neural network, which is neural network essentially but different from any other old neural networks. By the way, it is really rare to talk about neural networks.
About Yolo and Darknet
Darknet should not be ignored when mentions Yolo, but what are the relationships between them?
Yolo(you only look once) is an excellent networks model. It is a specially designed network model.
Darknet is a light deep learning training framework,which can be used for training and reasoning.
Yolo series are excellent networks models, which can be used to find the targets in the image and locate the certain locations.
Any way, you can not only train various network models in darknet, but also in yolo. Please browse for more information if interested.
About darknet_ros
darknet_ros is a ros pack combined Yolo and Darknet programed by Marko Bjelonic. It can be used in ros environment directly.
About darknet_ros topic
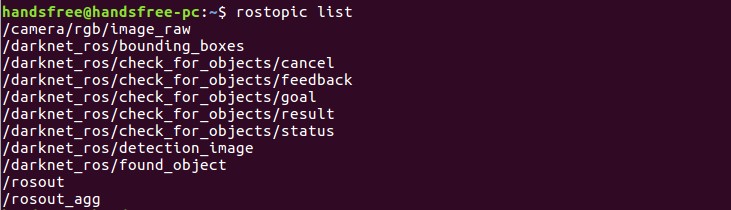
Subscribe topic
/camera/rgb/image_raw(used to subscribe camera topic)
Publish topic
/darknet_ros/bounding_boxes(used to publish boundary array, providing boundary location and size information in the form of pixel coordinates)
/darknet_ros/detection_image (includes boundary detected image)
/darknet_ros/found_object(number of detected objects)
For more information here
Start
- ubuntu version:Ubuntu16.04
- ros version:ROS Kinetic Kame
- install depends:OpenCV (computer vision library)
- install C++ dependent package:boost (c++ library)
- if you are the user of handsfree robots, you could not install Opencv and boost package additionally, for which we have already installed.
- here we take Xtion series depth camera Xtion pro as an example.
Build a darknet_ros_ws package
build
handsfree/darknet_ros_ws/srccatalog structuremkdir -p handsfree/darknet_ros_ws/srcclone darknet_ros to src and initialize work space
 cd ~/handsfree/darknet_ros_ws/src/
 https://gitee.com/HANDS-FREE/darknet_ros.git
 catkin_init_workspace
compile workspace in handsfree_ros_ws
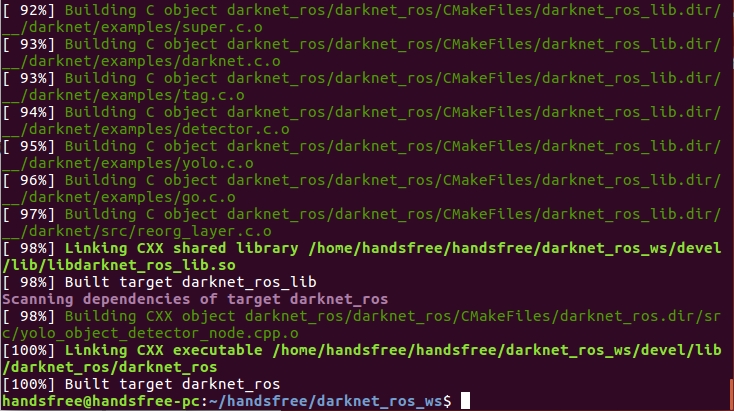
 cd ~/handsfree/darknet_ros_ws/
 catkin_make -DCMAKE_BUILD_TYPE=Release
You can find we add catkin_make behind -DCMAKE_BUILD_TYPE=Release. catkin_make is the default debug version. Add -DCMAKE_BUILD_TYPE=Release means compiling as release version.
In debug version, you can use single step execution and tracking function. But due to a large size of the executed file, it processes slowly. Release version functions fastly and the executed file is small. But it can't debug when in compilation.
when finished, it will show 100%
add
source ~/handsfree/darknet_ros_ws/devel/setup.bashin .bashrc fileecho "source ~/handsfree/darknet_ros_ws/devel/setup.sh" >> ~/.bashrc source ~/.bashrcDownload pretrained yolov3 model, you should down in this catalog(tips: too lang command, click the right mouse button 3 times and choose the whole command)
 cd ~/handsfree/darknet_ros_ws/src/darknet_ros/darknet_ros/yolo_network_config/weights
 wget https://handsfree-mv.oss-cn-shenzhen.aliyuncs.com/handsfree_download/ros_course/open_source_package/darknet/weights/yolov3.weights
Tested with images
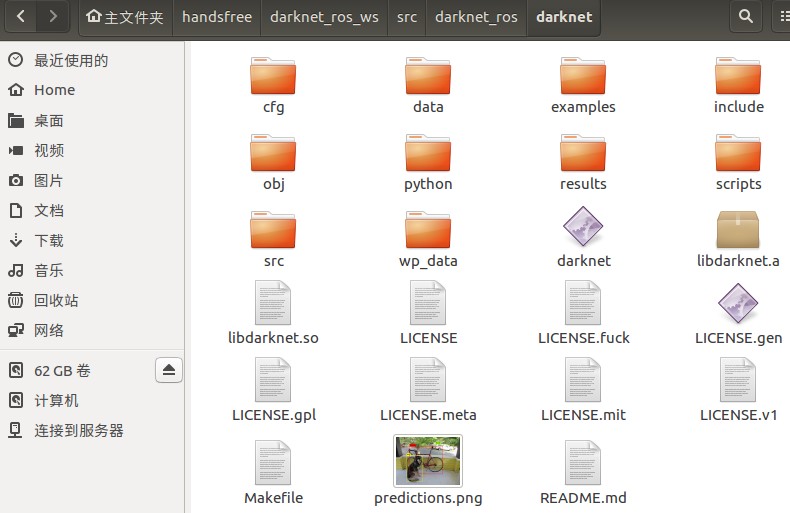
Compile darknet, copy the pretrained yolov3 model to wp_data folder.
cd ~/handsfree/darknet_ros_ws/src/darknet_ros/darknet
make
cp ~/handsfree/darknet_ros_ws/src/darknet_ros/darknet_ros/yolo_network_config/weights/yolov3.weights ~/handsfree/darknet_ros_ws/src/darknet_ros/darknet/wp_data/
When compilation finished, use commands in darknet catalog
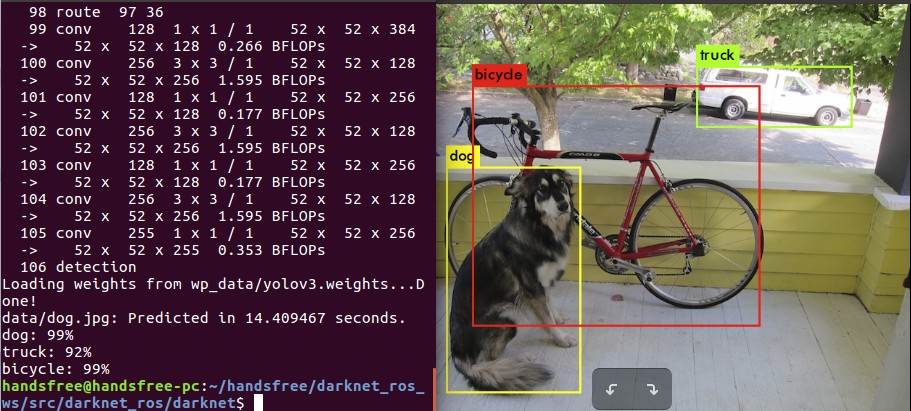
cd ~/handsfree/darknet_ros_ws/src/darknet_ros/darknet
./darknet detect cfg/yolov3.cfg wp_data/yolov3.weights data/dog.jpg
predictions.png is the generated image
 you can also test your images and put them in data catalog.
Use darknet_ros_ws package
Start camera driver
roslaunch handsfree_camera xtion.launchuse yolo_v3 model to detect objects
roslaunch darknet_ros yolo_v3.launchan image_view interface is opened, and you can see the detected objects
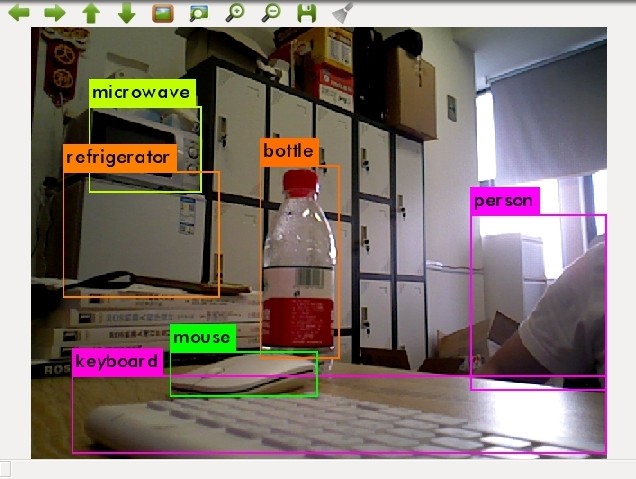 the detected information of objects will be displayed in the terminal, including predicted percentage of the objects.
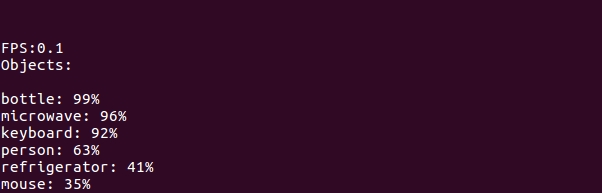 Now that we have fished darknet installation and basic use. Though with objects displayed, the fps is really low and does not function fluently.
Darknet supports both cpu and gpu computation, which we have mentioned previously. Here we use cpu to run darknet and yolov3. The computing speed between cpu and gpu is huge, which is over 100 times.(the gpu we mention here is the nvidia CUDA supported gpu)
So how can we use gpu? Let's check Makefile first.
Now that we have fished darknet installation and basic use. Though with objects displayed, the fps is really low and does not function fluently.
Darknet supports both cpu and gpu computation, which we have mentioned previously. Here we use cpu to run darknet and yolov3. The computing speed between cpu and gpu is huge, which is over 100 times.(the gpu we mention here is the nvidia CUDA supported gpu)
So how can we use gpu? Let's check Makefile first.
Check Makefile
Makefile introduction
In a project, there are multiple source files, located in various catalogs according their types, functions and models. Makefile has saved compiler and connectors' parameters. It also explains the relationships among all the files, defines the compiling sequence and rebuilding files. Even the much more complicated operation. It can execute operation command like a Shell script.
Check Makefile in gedit
gedit ~/handsfree/darknet_ros_ws/src/darknet_ros/darknet/Makefile
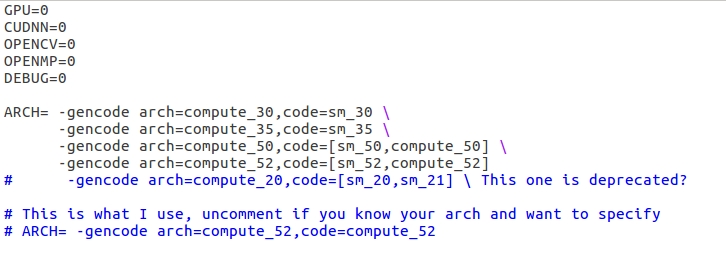
You will see multi information, including GPU, CUDNN, OPENCV, OPENMP, DEBUG, ARCH. You can change some parameters here.
Modify Makefile
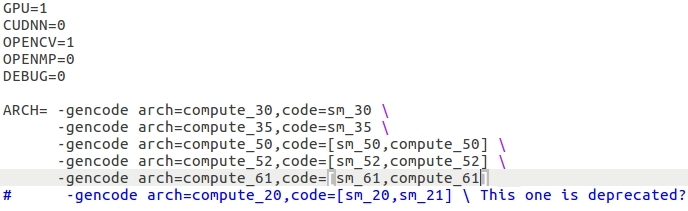
If you want to use GPU, CUDNN, OPENCV, OPENMP,DEBUG, just change 0 to 1. Make sure your computer has already installed prerequisites.
For example, if you want to use GPU, make sure your nvidia gpu support CUDA and install CUDA. You'd better install CUDA if you want to use CUDNN.
ARCH is the computing efficiency of your nvidia GPU, you can browse for more in nvidia
Take nvidia 1050ti GPU as an example, install CUDA9.0. From official website you can find the computing efficiency is 6.1, which is 61 here.
Save after each modification, delete the precompiled build and devel catalog then rebuild.
cd ~/handsfree/darknet_ros_ws/
rm -r devel/ build/
catkin_make -DCMAKE_BUILD_TYPE=Release
Install CUDA 9.0
Take GeForce GTX 1050 Ti as an example, the driver of this gpu is NVIDIA binary driver-version 384.130
Install CUDA You can browseCUDA toolkits and compatible package to check the proper version. You can also check through the following screenshots.
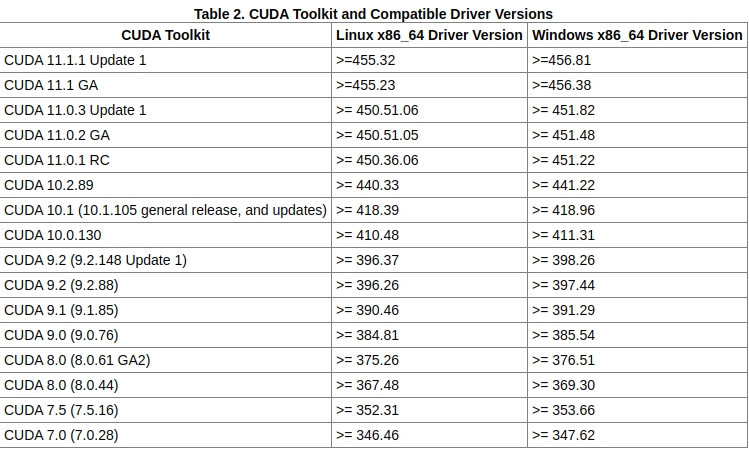 You can check other versions according to your request. This is cuda previous version
The following image is CUDA 9.0 installed choice, the instruction will show up when finished.
You can check other versions according to your request. This is cuda previous version
The following image is CUDA 9.0 installed choice, the instruction will show up when finished.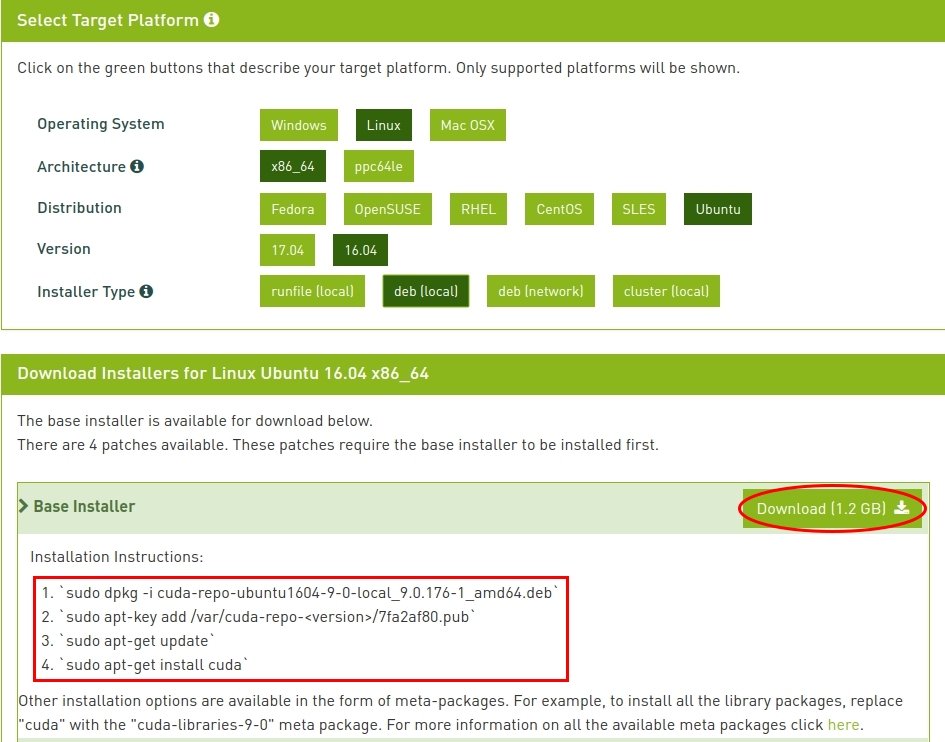 The official website mentions 4 ways to install, here we install by deb package.
Install cuda When finished, we begin to install. According to the instruction, we open a terminal in the folder we install cuda, execute these commands.
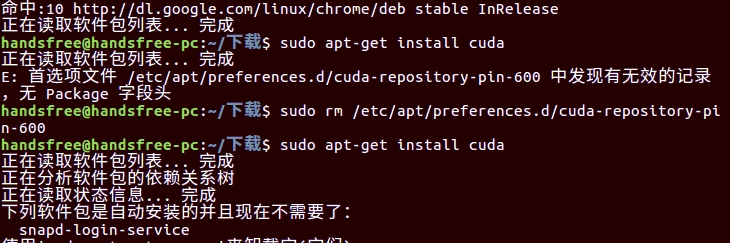
 sudo dpkg -i cuda-repo-ubuntu1604-9-0-local_9.0.176-1_amd64.deb
 sudo apt-key add /var/cuda-repo-<version>/7fa2af80.pub
 sudo apt-get update
 sudo apt-get install cuda
If the following errors are shown up, just remove the corresponding file mentioned in the terminal.
Configure environment
 echo "export PATH=/usr/local/cuda-9.0/bin:$PATH" >> ~/.bashrc
 echo "export LD_LIBRARY_PATH=/usr/local/cuda-9.0/lib64:$LD_LIBRARY_PATH" >> ~/.bashrc
 sources ~/.bashrc
If you install other versions, it is recommended that find the two corresponding catalogs and replace the paths in the below commands.
Successful or not You can input
cudain terminal and click tab twice. It will complete automatically if installed successfully. You can also use one of the following commands to check if any message shown up.nvcc --version nvcc -V

Relative expanation
Knowledge about GPU
Graphics Processing Unit(GPU), or display core, visual processor, display chips, is a microprocessor to generate image in PC, working station, game players and mobile devices. GPU decrease the dependency of CPU and complete some CPU work. In particular, the core technologies used in GPUs for 3D graphics processing are hardware T&L (geometry transformation and lighting processing), cubic ambient material mapping and vertex blending, texture compression and bump mapping, dual-texture quad pixel 256-bit rendering engine, etc. The hardware T&L technology is arguably the hallmark of GPUs
Knowledge about CUDA
CUDA (ComputeUnified Device Architecture), is a computing platform introduced by graphics card manufacturer NVIDIA. CUDA is a general-purpose parallel computing architecture introduced by NVIDIA that enables GPUs to solve complex computational problems.
Knowledge about CUDNN
NVIDIA cuDNN is a GPU accelerated library for deep neural networks. It emphasizes performance, ease of use, and low memory overhead. nvidia cuDNN can be integrated into higher-level machine learning frameworks such as Google's Tensorflow, and UC Berkeley's popular caffe software. The simple plug-in design allows developers to focus on designing and implementing neural network models, rather than simply tuning performance, while also enabling high-performance modern parallel computing on the GPU.
Knowledge about OPENCV
OpenCV is an open source distribution of a cross-platform computer vision and machine learning software library that runs on Linux, Windows, Android, and Mac OS operating systems. It is lightweight and efficient - consisting of a set of C functions and a handful of C++ classes - and provides interfaces to Python, Ruby, MATLAB, and other languages, implementing many general-purpose algorithms for image processing and computer vision.
Knowledge about OPENMAP
This high-level abstraction of parallel description provided by OpenMP reduces the difficulty and complexity of parallel programming, so that programmers can devote more effort to the parallel algorithm itself rather than to its concrete implementation details. For multi-threaded programming based on data diversity, OpenMP is a good choice. Also, using OpenMP provides more flexibility and can be more easily adapted to different parallel system configurations. Thread granularity and load balancing, etc. are difficult problems in traditional multithreaded programming, but in OpenMP, the OpenMP library takes over some of these two aspects from the programmer